Home Blog Page 66

How to Block Number in Jio Phone?

0

Do you need to block a number in your Jio Phone? Maybe an annoying telemarketer is constantly calling or someone you don’t want to have contact with anymore is bothering you. No problem! This guide will show you how to block numbers in your Jio Phone in just a few simple steps. Keep reading for more information.

Do you want to add a certain number to your blacklist to prevent incoming calls on your Jio phone? If so, you’ve come to the perfect spot to learn how to block a number on a Jio phone.

It frequently happens that certain people bother us by phoning all the time, or that we dislike the fact that a specific person contacts us. In such a case, we must block the number from which the other person calls us.

Whether it’s a smartphone or a keypad phone, every mobile phone has the ability to block specific or numerous numbers. So that the other person does not have to bother us by phoning all the time.

As a result, if you have a Jio phone keypad, call blocking options are accessible. You may also unblock the banned number on your Jio phone at any moment.

So, if you don’t know how to add a phone number to the blacklist to prevent receiving calls from that number on your Jio phone? Then you don’t have to be concerned since we’ve provided a step-by-step guide for banning numbers in Jio.

How to Block Incoming Calls from a Number on Jio Phone – 3 Methods

We have discussed two techniques for banning numbers on Jio phones: Jio Chat, Contact setting, and Call barring setting.

The first way, which is of jio chat, will allow you to block single or numerous numbers by adding which you want to block into it. The second approach is the Contacts option, which will halt or block single or many numbers in your Jio phone like the first technique did.

And the third approach, which differs from the first and second methods, is to use the call barring setting to block all incoming calls.

As a result, you may choose the strategy that is best for you based on your requirements.

How can I ban a number on my Jio phone using the Jio Chat app?

Jio chat app is accessible for all Jio phones, Android phones, and iPhones. It enables high-quality chats, voice calling, and video conversations to everyone.

In addition to these features, it allows you to block a certain number for incoming calls and unblock that number once it has been blocked. So, let us talk about it.

To ban a number in a Jio phone using the Jio Chat application, follow the steps below:

  • To begin, turn on your Jio phone’s cellular data.
  • On your Jio phone, launch the Jio Chat app. By the way, it comes pre-installed when you buy it new. If it isn’t already installed, get it from the Jio Store app.
  • As shown in the image below, select the choice.
Put blacklist number in jio phone
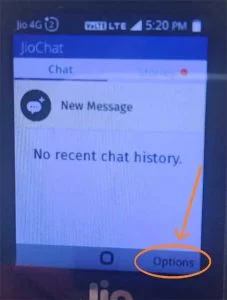
  • When you click on the choice, you will be able to access the configuration options.
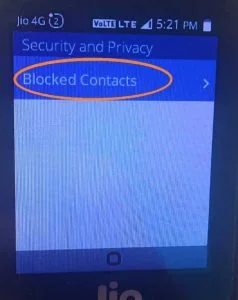
  • You must scroll down and select the “Privacy and Settings” option.
  • Then choose the option to block contacts.
Block contacts in jio phone
  • When you click it, all of your contact lists will be revealed. So, choose the contact number you wish to block and click the Block button.
  • Finally, click the button to add the choice. By selecting the Add option, you may now block a specific number on your phone.
How to block number in jio phone

You should now understand how to block numbers in a Jio phone using the Jio chat app if you followed the procedures outlined above. As a result, all you have to do is follow the instructions outlined above.

How can I use the Contact option in Jio to block numbers?

Almost every phone has a contact feature that allows you to block a certain number. As a result, the Jio phone contains a function that allows you to block single or multiple numbers via the contact settings.

To add a number to the blacklist in your Jio phone, follow the steps below:

  • To begin, open the contacts app on your Jio phone.
  • Choose the contact number you wish to add to the blacklist.
  • The number will display as you pick. So, select one of the possibilities.
  • Scroll down and select the “block this Number” option.
  • You will now be prompted to confirm the blocking of a certain number.
    So, select the block option.
  • When you click on the block, the number is added to the block list and the block icon appears in front of it.

As a result, if you followed the preceding approach, you would have learned how to block a number in a Jio phone using the contacts setting. Blocking a certain number is a pretty easy operation.

If you wish to block numerous numbers, you must repeat the process for each one in order to block the number on your Jio phone.

How can I ban all numbers in my Jio phone using call blocking?

Call blocking functions are available in practically any phone, whether it be a smartphone or a keypad phone. Call barring’s function is to prevent all incoming, outgoing, and international calls.

So, if you want to block all incoming calls on your Jio phone rather than just one number, call barring is the ideal option.

As a result, if you wish to block all integers, you may use this approach. So, let’s go over the procedure.

To enable call barring and prevent all incoming calls, use the following settings:

  • Open your Jio phone’s settings app.
  • Scroll down and choose the call setting.
  • Scroll down and choose the call blocking option.
  • Then, under the incoming call area, scroll down and choose the All option.
  • Now, activate the option and press the OK button.
  • Finally, by entering the jio phone’s password, all incoming calls will be successfully stopped.

As a result, you would have learned how to block all incoming calls on a Jio phone using the call barring setting. This is the procedure to follow if you want to use your phone but do not want to receive any calls.

How can I unblock a Jio phone number? 3 Approaches

You wish to unlock the number that you previously banned once you have blocked it. As a result, the technique you used to block the contact must also be used to unblock the contact.

For example, if you banned a phone number using the Contact setting, you must unlock the phone number using the Contact setting only.

And if you have banned all incoming calls using call barring, you must unblock using call barring only. In the preceding section, we discussed the three techniques for blocking a number.

As a result, we will learn how to unblock numbers on Jio phone utilizing three different methods: Jio chat, Contact setting, and Call blocking. So, one by one, let’s find out.

How can I allow a number to call me once it has been blocked on my Jio phone using JioChat?

Because you banned a contact number using Jio Chat, you will need to repeat the process to unblock the number in your Jio phone using Jio Chat.

  • Open the Jio Chat app on your Jio phone and then tap the settings button.
  • Click the setting button, then the security and privacy button.
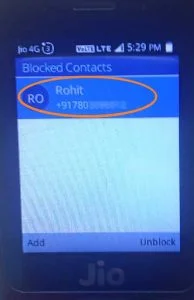
  • Navigate to the Blocked Contacts tab.
  • The blocked contact will show when you click. So, choose it and then click the Unblock button.

The banned number will be erased from the list as soon as you click the unblock button. And the other person may call, and incoming calls will come from that number.

How to Unblock a Jio Phone Number Using Contact Settings

If you have banned a number using the Contact option, you will need to use this procedure to unblock that number.

Follow the steps outlined below to unblock a phone number using contact settings:

  • Open your Jio phone’s contact list.
  • Select an option from the drop-down menu.
  • Scroll down to the settings section.
  • Scroll down again and choose the option to block contacts.
  • When you click block contact, all of the blocked numbers will be shown.
  • So, choose the contact you wish to unblock and then click the unblock button.
  • You would have learned how to unblock a certain number in a Jio phone by following the steps outlined above.

As a result, utilizing the contact option to block and unblock any specific number is a simple operation.

How do I stop call blocking for banned incoming calls on my Jio phone?

If you have banned all incoming calls, you will undoubtedly need to deactivate it after some time. As a result, you must unblock all incoming calls by deactivating incoming calls in the call barring option.

By the way, the method will be the same whether you enable the call barring option and block all incoming calls. All you have to do is turn off the call blocking feature.

So there’s no need to go over the process step by step because you already know how it works.

How to Block a Number with a Jio Phone?

How can I use Jio Security to ban a number on my Jio phone?

Many of them look up this term because they wish to ban numbers on their Jio phone utilizing Jio security. However, we regret to inform you that the Jio Security application is not yet available for the Jio phone.

Only one Jio security app is available for Android and iOS smartphones. As a result, you cannot use the Jio Security app to restrict or unblock any number on your Jio phone.

Will I be able to call the number once it has been blocked?

Yes, even if you have banned a certain number, outgoing calls are still enabled. Incoming calls will not be received from the number you have banned.

After blocking it, you may easily call without doing anything. If you want those folks to be able to call your number, you must unblock it.

Also Read:

Conclusion

Finally, we hope that you have a better understanding of how to block number on jio phone using numerous techniques. We attempted to fix your problem in the best possible way and using every available option.

All of the methods described in this post will work on your Jio phone. If your Jio phone is ancient, the second technique may not work. jkjndknlf jkjndknlf jkjndknlf j

If you have any questions about banning numbers on a Jio phone, please leave a comment below. We hope that after reading this post, all of your questions have been answered.

If you’re reading this, chances are that you want to take a screenshot on your Jio phone. It might seem simple enough but if it doesn’t work the first time, don’t get discouraged! There are many options for taking screenshots in Jio phones and we will go over them below. Scroll down to find out how to take a screenshot with your Jio Phone!

How to Take Screenshot In Jio Phone?

0

In this blog post, we’ll show you how to take a screenshot on your jio phone. Screenshots can be useful for capturing pictures of your screen or for saving important information. Follow these simple steps to take a screenshot on your jio phone.

Do you also want to know how to capture a screenshot on a Jio phone? If you answered yes, you’ve come to the correct spot to learn how to capture photographs and screenshots from your Jio phone.

As you are aware, we frequently need to snap photographs of the screen on our mobile devices. Nowadays, the Screenshot function is accessible on practically every smartphone.

However, most people in India use Jio phones since they have the same features and functionality as an Android smartphone. So, if you have a Jio phone, you will undoubtedly need to take a screenshot of your Jio phone.

To begin, many Jio phone users wonder, “Is there any function accessible on Jio phone for recording screen image?” So, if you’re likewise curious about the solution to this question, don’t worry.

As a result, we’ll find out below if that’s achievable or not. If this is feasible, how do you take a screenshot on a Jio phone? So, let us talk about it.

Is it feasible to take a screenshot of a Jio phone?

Yes, you can simply capture screenshots of every screen display on your Jio phone, but not on all models. As a result, the screenshot capability is not accessible on all Jio phone models.

However, if you wish to capture a screenshot of any page in the browser of your Jio phone, you may do so on all variants of the Jio phone.

I’d want to clarify that if you wish to capture a screenshot of something other than the browser app, such as settings, other applications, documents, etc., you can only do so on one type of Jio phone.

However, screenshots of any webpage within the browser app may be captured with any Jio phone mobile. Now, I’m hoping that the situation regarding the ability to capture screenshots on a Jio phone has been clarified.

Finally, I’d want to make it clear that the Jio Phone F320B newest model 2021, which includes screenshot capabilities, allowing you to take screenshots. Now, let us learn how to capture a screenshot in a Jio phone in the sections below.

How to Take a Screenshot on the New Jio Phone F320B?

As I previously stated, this kind of Jio phone allows you to capture screenshots of everything on the screen, much like an Android smartphone. So, if you need to know about its screenshot technique, let us know.

Before beginning, it is important to remember that you must have a jio phone of the F320B model; otherwise, the technique will not function on any other type of jio phone.

To take a screenshot on a smartphone, we need to hit the power button and volume up. In the same way, you must hit a button on your Jio phone’s keypad to capture screenshots.

To take a screenshot in the new Jio phone F320B model, follow the steps below:

  • Open the screen of your Jio phone where you wish to capture screenshots, such as in an application, document, or other source.
  • As you open the place where you wish to take a screenshot, press and hold the * and # keys on your Jio phone for a few seconds.
How to capture screenshot in jio phone
  • You will be alerted within a few seconds that the Screenshot has been saved to the gallery.
  • All screenshot photographs will be saved in the gallery of your Jio phone. As a result, you may see your Jio phone screenshot photographs from the gallery.

By following the steps outlined above, you should have a good understanding of how to capture a screenshot in a Jio phone of the new model F320B using a button.

How to Get a Jio Phone How can I take a screenshot of every model on any website in three different ways?

If you have a jio phone that is not the F320B newest model, you can only take a screenshot of a webpage using the jio phone’s browser application.

You cannot take screenshots on a Jio phone if you wish to capture other programs, settings, or documents.

By the way, it is possible to capture screenshots on Jio phone using OmniSD by downloading an external software on Jio phone, however this is unofficial and the method is lengthy.

So, I’d like to inform you that there are numerous websites that will supply you with a screenshot of any website if you enter the website URL on the specific screenshot provider website.

As previously said, there are several screenshot capture websites for Jio phones accessible. So far, we’ve discussed four websites for taking screenshots and methods.

How to use screenshotmachine.com to capture a screenshot on a Jio phone?

  • Open the browser app on your Jio phone and navigate to the website you wish to capture a screenshot of.
  • Copy the URL of the website from which you wish to take a screenshot.
  • Then, in your browser, type screenshotmachine.com and go to this page.
  • Paste the website url you copied previously into the “Type webpage URL” box.
  • For greater image size in Jio phone, select phone from the device type option.
  • Scroll down and choose the “Capture Screenshot” option.
How to take snapshot on all model in jio phone
  • The snapshot will be ready as soon as you click it. So, select the download screenshot option, and your screenshot will appear in the gallery or as a download file on your Jio phone.
  • In this manner, you may simply collect screenshots of any webpage using the screenshotmachie.com website on any kind of Jio phone.

Now, let’s look at the information below with the aid of other websites.

How to use site-shot.com to take a screenshot of a Jio phone?

Site-shot.com is a service that allows you to capture a screenshot of any website by entering its URL. By the way, you may use it on any device, however the major reason for mentioning it here is for Jio phones.

  • Go to site-shot.com. Website on your Jio phone’s browser.
  • Enter or paste the website URL into the box.
  • Click the Shot button to take screenshots of the page on your Jio phone.
How to take screen images on jio phone
  • Scroll down and you’ll see a snapshot of a specific URL. So, to save screenshots on your Jio phone, click on the download sign.

How to Use Web-capture.Net to Take a Snapshot of a Website on a Jio Phone?

Web-capture.net is a simple website that allows you to take a screenshot of a webpage or URL and save it to your Jio phone or any other phone.

  • Using the browser app on your Jio phone, navigate to the web.capture.net website.
  • Copy and paste the internet url into the box labeled “Enter URL to Capture.”
  • Finally, select “Capture web page” from the drop-down menu.
How to take screen shot images in jio phone
  • You may now see a snapshot of a specific. So, choose the download option to save the screenshot to your Jio phone’s gallery.

FAQ on How to Take a Screenshot on a Jio Phone

Can I capture screenshots of the jio phone’s buttons?

As previously stated, a screenshot may be captured using the Keypad button on a Jio phone, but only on the most recent model of Jio phone, which was released in 2021.

The model of Jio phone that supports the Screenshot capability is the F320B. The major reason you can’t capture a screenshot on an outdated Jio phone is that the operating system in which kaios are installed on your Jio phone does not allow for screenshots.

Screenshots can also be captured on the old jio phone, however you will need to tweak the kaios operating system of the jio phone in order to install external programs for collecting screenshots.

Can we record screen on any Jio phone model?

No, screen recording is not possible on any type of Jio phone since Kaios, even in its newest version, does not enable this capability.

This function may be introduced in the future, however it is currently not feasible to use on your Jio phone.

How can I use Google Assistant to capture a screenshot on my Jio Phone?

If you search on YouTube for the technique of taking a screenshot on your Jio phone, you will be taught the procedure by the Google Assistant. Some bloggers have claimed capturing screenshots on a Jio phone using Google Assistant.

However, you cannot take screenshots on your Jio phone using Google Assistant. The screenshot was captured with Google Assistant, but only on a smartphone.

They said that you should keep pushing the mic button on your Jio phone and then speak “OK Google.” Finally, you must state that you will take a snapshot of the Google Assistant in accordance with their protocol.

However, it does not work, and you may try it on your Jio phone if you want to.

Also Read:

Conclusion on Screenshot Capture with Jio Phone

I hope you are aware of how to capture a screenshot in a Jio phone, as I have explained in this post. We have covered every crucial aspect of capturing screenshots on a Jio phone.

Finally, if you have the latest model of jio phone F320B, you may use it as a smartphone to capture screenshots of anything. However, if you have a different type of Jio phone, we have given a remedy by capturing a screenshot from the page.

In addition to this, we have included Frequently Asked Questions about Snapshot in Jio Phone. So, now you know everything there is to know about screenshot jio phone. If you have any questions or comments on this issue, please leave them in the comments section.

There you have it. You now know how to take a screenshot on your Jio phone and can use this knowledge for all of your capturing needs! Thank you so much for reading, we hope that these tips will help you with all of the screenshots that need taking in the future. Now go out there and capture some memories!

How to Hide Chat In Instagram?

0

Do you ever get tired of all the people that you follow on Instagram constantly bombarding your feed with posts? Well, if you’re looking for a way to hide chat in Instagram so that you can enjoy your feed without interruption, we’ve got the steps for you! Keep reading to learn how to disappear those chats.

Are you interested in learning how to conceal conversation in Instagram? If you answered yes, you’ve come to the perfect spot to learn how to hide your Instagram messaging chat.

Most Instagram users have personal or private chats that they do not want anybody else to be able to view.

This indicates that users wish to hide the Instagram personal chat so that no one can see the dialogue of the conversations. However, users are unable to conceal their Instagram chats because Instagram does not give any direct hiding options.

So, we’ve discussed the ways for concealing the Instagram chat with step-by-step instructions and screenshots. The method described in this post on how to conceal conversation in Instagram is 100 percent authentic and effective.

Is it possible to hide Instagram messages?

First and foremost, the question of whether Instagram messages may be hidden emerges. So, certainly, you can simply conceal your instgarm chat messages.

As I previously stated, Instagram does not provide any direct hiding abilities. As a result, concealing instagram message chat is achievable using some of the amazing approaches.

So, let’s go over the process and ways for concealing Instagram conversation.

3 Methods to Hide Instagram Chat

There are three methods for entirely and completely hiding your Instagram interaction. As a result, they are setting the disappear mode, downloading the locker Instagram chat app, and changing the Instagram account to professional.

So, the three approaches are listed below, along with step-by-step instructions. As a result, let’s talk about it.

How can I use Instagram’s disappear mode to hide a chat?

If you are unaware of the current features of Instagram’s disappear mode, let me explain in brief. Vanish mode is a function that may be used when conversing with anyone.

When someone activates the disappear mode, it is activated on both sides (accounts) of the conversations. It implies that if the disappear mode features are enabled on one user, they will be enabled on the other user with whom you are conversing.

Vanish mode is similar to incognito mode in a private conversation. So, whatever communication is done from both sides after enabling disappear mode will not be kept, and the messages will be removed as soon as the user exits the chat from both sides within a minute.

By the way, the vanish mode function does not conceal your Instagram chat; rather, when you use the vanish mode in your Instagram chat, your past chats are hidden and may be unhidden at any time.

So, let’s go through how to conceal conversation in Instagram by enabling disappear mode step by step:

  • Open the Instagram app on your Android or iPhone.
  • Open the Instagram chats that you wish to conceal.
  • Swipe up in the chat to enable disappear mode, which will hide the talk on your Instagram.
  • The preceding message will now be erased.

You may easily conceal your Instagram WhatsApp chat by following the steps outlined above. However, if the aforementioned technique does not allow you to hide your conversation, there is another option. So, let’s learn about those ways.

How to Hide Messages on Instagram 2021 Using the Instagram Locker App?

The Locker for Instagram Social is a third-party program that allows you to lock an individual or specific Instagram conversation directly. By the way, this strategy will not hide your Instagram conversation.’

However, you want to lock your Instagram conversation so that no one may view it. So, you may achieve so by activating passwords on the specific Instagram chat, after which no one will be able to view the Instagram chat conversation.

So, let’s learn how to hide a discussion in Instagram by locking it using the Instagram locker:-

  • Install the “locker for insta social” app from the Google Play store on your Android phone.
  • Open the app and input the four-digit password for the Instagram chat. It implies that anytime you lock or unlock Instagram chat, it will be required.
  • Enter the recovery email address, which may be required if you forget your password.
  • When you input your email address, you will be prompted to activate accessibility features for this app. So, when it redirects in your phone settings, press to activate and switch on the services.
  • Now, as seen in the image below, tap the Plus symbol.

You will now be redirected to the Instagram official app. So, go to the message and hit the conversation that you wish to lock.

As you tap, the password will be successfully activated for that specific Instagram conversation, and everytime you open that chat, it will require a password to see the message or chat.

How to Unlock the Chat Using the Instagram Social App Locker:

  • Open the Instagram social app locker on your phone.
  • Tap the lock symbol next to the chat you wish to unlock.

You would have learned how to conceal conversation in Instagram by locking the chat with the Instagram chat hide program – locker for insta social application in this manner. Now, let’s go on to the final way for hiding insta chat, which is to use a corporate account.

How can I conceal Instagram DM talks from my business account?

When Instagram users establish an account for the first time, it is in the form of a personal account. However, Instagram offers a business or professional account that may be used by anybody.

As a result, the professional or business account offers several additional capabilities above the standard personal account. A business account, by the way, does not have the ability to conceal a conversation, but you may hide a chat in Instagram using other tools.

Basically, like a personal or standard Instagram account, we simply have a major part in the messages where all messages and chats are shown.

However, if you change your Instagram account to a business or professional account, you will be able to access the features of Primary and General in the messaging area.

The messages in the primary area arrive on a daily basis, whilst the fresh messages in the general section arrive from an unknown source.

So, first, you must convert your account to business, then shift the specific conversation to the general category, and last, switch accounts to personal accounts.

You may quickly conceal Instagram conversations by following this approach. So, let us go over the technique step by step.

Follow the steps below to learn how to conceal Instagram conversation using business account techniques:

  • Open Instagram and navigate to your profile.
  • Tap the three-dot menu line in the upper right corner.
  • Navigate to the settings menu by clicking the gear icon.
  • Navigate to the account settings.
  • Scroll down and select the Switch account type option.
  • Tap the switch button once more to confirm the business account selections.
  • Open your message and navigate to the chat you wish to conceal.
  • To access the “Move to General” choices, click the “Move to General” button.
  • The discussion will now be moved to the General area.
  • Now, switch the account from a business account to a normal personal account; the general choices will disappear, and your specific conversation will be concealed.
  • When you need to unhide the Instagram chat, switch back to your company account and adjust the chat from general to private.

By following the steps outlined above, you would have learned how to conceal an Instagram chat list or a single discussion by switching to a business account and relocating the chat into the general parts.

Also Read:

How To Connect Jio Fiber to PC?

FAQ on How to Hide Instagram Chat?

Can we save the conversation on Instagram?

As you archive conversation in Whatsapp to conceal the chat, you’re probably wondering if you can hide talk on Instagram as an archive option.

So, unlike WhatsApp, Instagram does not have an archive option, but by using various strategies, you may simply hide your Instagram chats that you wish to do through archive.

Is it possible to conceal a discussion on Instagram?

Yes, you can easily conceal your Instagram chat discussion by using any of the three strategies outlined in this post, but not directly.

You may hide your Instagram conversations by using disappear mode, switching to a professional account, and installing a single program – locker for insta social app.

Finally, without erasing messages, you may hide your Instagram conversation.
I hope you learned how to conceal conversation in Instagram with the aid of this post. Since then, three methods for masking your personal Instagram chat have been disclosed.

All of the procedures are described step by step with screenshots, and we also give answers to commonly asked concerns about Instagram’s concealing and locking conversation.

If you are having any issues with the instgaram chat, please leave a remark below and we will respond with solutions.

There are many ways to hide chat in Instagram. The simplest way is by turning off the “Chat” option in your profile settings, which you can find under the Profile tab when editing your account’s details. If that doesn’t work for you or if there are other issues with how it looks on your screen, try changing the Chat size and color options from small and green to big and blue. You can also delete all of this information so people don’t know who you’re talking to at any given time!

How to Remove Channel From Airtel DTH?

0

Airtel DTH is one of the most popular DTH service providers in India. It offers a variety of channels to its users. However, at times, you may want to remove some of the channels from your Airtel DTH subscription. This blog post will tell you how to do that. Keep reading for more information.

Are there any unwanted channels on your Airtel Set-top box? If you answered yes, you will undoubtedly want to delete those television stations. But don’t be concerned if you don’t know how to delete a channel from an airtel dth.

We have provided a step-by-step approach for deleting TV channels that you do not view on your Airtel DTH. Many times, certain incorrect television channels are automatically activated on our Airtel DTH package.

As you are aware, we all view a restricted number of television channels; nevertheless, there are certain channels that we do not see that are also functional. And we have to pay for such channels even if we don’t watch them.

So, if you want to save money by uninstalling unneeded channels from your Airtel DTH set-top box, you’ve come to the perfect spot. In addition to how to delete tv channels from airtel dth?, we have addressed a number of similar questions. So, let’s find out.

Is it possible to uninstall the Airtel DTH TV channel?

The most crucial question now is whether it is feasible to delete channels from Airtel DTH. So, if you want to know the answer to this question, I’ll tell you in a nutshell.

Except for a few channels, you may simply add or delete channels from your Airtel DTH. Airtel allows their customers to administer their own airtel dth.

By the way, you must phone customer service or visit a store to activate and deactivate channels on your Airtel DTH. However, you no longer need to travel someplace or call for anything to be activated or deactivated.

Let us now look at the approach and procedure for disabling channels on Airtel TV.

How to Deactivate a Channel in Airtel DTH Using Different Methods

There are three ways to deactivate undesired TV channels on your Airtel DTH. So now you know how to uninstall TV channels on your Airtel receiver in three different methods.

They are available through the My Airtel Thanks app, SMS Service, and the Airtel office. So, with the assistance of a screenshot, we have described the step-by-step technique of these three ways.

As a result, you can use any of the three techniques listed below to remove channels from Airtel DTH. So, let’s go over each method’s technique.

How can I deactivate a channel from my Airtel DTH service using the Airtel app?

As you may be aware, practically every sort of Airtel function can be adjusted using the Airtel Thanks app. Whether it is a prepaid or postpaid cellphone connection, an Airtel DTH connection, or a broadband connection, etc.

The airtel application can simply handle all of the aspects of these connections. So, if you have an airtel number or another connection, you need install my airtel thankyou program.

This program not only allows you to control Airtel services, but it can also be used to administer UPI apps. We now have a summary of its features.

So, let’s go over how to deactivate a channel with Airtel DTH using the Airtel Thanks app.

Follow the steps below to learn how to delete a channel from your Airtel DTH.

STEP 1: Download and install the app, then sign in with your Airtel phone number.

  • On begin, download the Airtel Airtel Thanks app from the Google Play or Apple App Store to your smartphone.
  • As you open, select the Let’s Get Started option.
  • You must now sign in with your Airtel number by providing your cell number and OTP. So, input your cellphone number and then select the Send OTP button, and your OTP will be detected immediately.
  • Choose a language and then press the next button.

Finally, your Airtel number will be used to log in. Please keep in mind that you must log in using the airtel number that is recorded on your airtel dth.

STEP 2: Register your Airtel DTH account on the Airtel Thanks app.

So, first and foremost, you must link your Airtel DTH account to the Airtel Thanks application. So, select the more option.

  • Go to my Airtel option by clicking here.
  • Then, select the account management option.
  • To add your dth account, select the Add Account option.
  • As shown in the picture below, tap the prepaid down arrow and pick the DTH option.
  • Then input your DTH account number and select the Request OTP option.

Finally, input the OTP that was received to your registered cellphone number and click the Confirm OTP button. Your Airtel DTH account will now be added.

STEP 3: Uninstall Airtel DTH Channels

  • You must now return to the homepage of the Airtel Thanks application.
  • You will be able to monitor the balance and validity of your airtel DTH on the webpage (Set-top box). Tap in that location.
  • Then select My account from the drop-down menu.
  • Tap the change plan option, then scroll down and pick the alter current plan option.
  • Scroll down and click the “Skip to channel selection” button.
  • Now, choose “In my existing plan,” and all of the channels that are enabled will display.
  • As a result, you must select the Remove option for the channel you wish to delete.
  • After selecting the “Remove” option, you must select the “Go to summary” option.
  • Finally, as seen in the image below, select the “Confirm & modify” option. After you confirm, you will receive a notice saying, “Congratulations – you have successfully changed your plan.”

As a result, you would have simply understood how to delete the channel in airtel dth by following the aforementioned approach.

How can I deactivate a channel from Airtel DTH using SMS?

You may also cancel an undesired channel by sending an SMS from your registered mobile phone. This method’s technique is quite straightforward when compared to other options such as the Airtel Thanks app and website.

You may also delete the airtel dth tv channel by sending an SMS if you have a keypad phone. So, how can you remove TV channels from Airtel DTH via SMS?

If you wish to transmit using an unregistered mobile number, you must additionally submit a customer ID in this step. And if you send it to the registered cellphone number, you won’t have to send it to the consumer.

To delete channels from your Airtel Set-top box, follow the steps below:-

  • Go to your smartphone and open the message.
  • Type REM Channel Number> for a registered mobile number.
  • For an unregistered mobile phone number, enter REM channel Number> Customer ID>.
  • After then, mail it to the 54325. You must transmit to 54325 from a registered or unregistered phone number.
  • You would have understood how to delete Channel in Airtel DTH in this manner. It is a fairly easy technique in which you just compose and send messages from your mobile phone number.

How can I delete a channel from my Airtel Set-Top Box via the website?

Almost all tasks may be completed using Airtel’s official website as an airtel thankyou application. As a result, you may also use the website to delete TV channels from your Airtel DTH.

The approach described above will only work on mobile devices. However, with the aid of a website, you can perform the same operation on your computer, laptop, or mobile device. So, let’s find out.

Follow the steps below to learn how to delete a channel from your Airtel DTH:

  • To begin, open any browser and navigate to the airtel.in website from your mobile device or PC.
  • As seen in the image below, tap the login option.
  • Enter your registered airtel dth mobile number and select the “Click to receive One Time Password (OTP)” option.
  • Enter the OTP and press the login button.
  • The amount and validity of your Airtel DTH will now be shown. So, as seen in the picture below, hit the next arrow option.
  • Select “Manage TV Channel” from the drop-down menu.
  • Select the option to Edit current plan.
  • Press the A-la-carte option in the navigation menu, then tap “In my existing plan.”
  • Now, select the category of the channel you wish to delete.
  • So, press the “Go to summary” option after clicking the Remove option of a channel.
  • Finally, press the confirm/change button.

You would have learned how to delete channels in airtel dth via airtel’s official website if you had followed the steps outlined above.

By the way, the method is the same through the website as it is through the Airtel Thanks app.

What are the benefits and drawbacks of removing Airtel TV Channel?

By the way, there is no downside to turning off any channels on your Airtel DTH. Because you simply need to eliminate the channels you don’t want to view.

I think the downsides of eliminating TV channels from the Airtel receiver were evident. Let us now discuss the advantages of it.

There are several advantages to uninstalling an airtel tv channel that you do not want to watch or that is incorrect for you. When you delete a channel, your airtel dth plan decreases, which saves you a lot of money.

As a result, these are the minor benefits of eliminating channels from the Airtel DTH Set-top box. As a result, there will be no price or drawbacks to disconnecting the channel.

FAQ on How to Remove a Channel in Airtel DTH

In Airtel digital TV, how can I choose and deselect a channel?

Using airtel thanks, airtel’s official website, or SMS, you may quickly pick and deselect a channel in airtel digital TV. You may activate and deactivate channels on your airtel digital tv whenever you need to add or remove one.

So, if you can follow the technique for eliminating channels in airtel dth that we described. By the way, we have not prepared an article on how to add a channel, but once you see how to remove, you will be able to add.

Will the removal of a channel from Airtel DTH have any effect on the plan?

Most consumers are unsure whether there will be any changes to a plan as a result of adding or eliminating channels. If you’re curious, I’ll tell you in a nutshell.

As a result, removing channels increases the validity of your Airtel DTH. These are the primary advantages of deleting television channels.

How can you check the active channel on your Airtel DTH?

By the way, if you follow the protocol for removing a channel from an Airtel DTH? Then you’ll be able to see the active channels on your Airtel DTH. So, if you want to know what the current choose tv channels are on your Airtel dth, let me tell you.

To find out what channel is active on your Airtel DTH, follow the steps below:

  • Log in with your registered mobile number to access my airtel thanks.
  • Add your airtel dth customer id to the airtel my thanks app.
  • Click on the airtel dth balance and validity area.
  • Tap on Manage Account, then Edit Current Plan.
  • Tap the a-la-carte option, then the “In my existing plan” option.
  • Every active channel on our plan will now be listed by category.

Also Read:

Conclusion on disabling a TV channel on an Airtel DTH system

I hope you are aware of the numerous options for removing channels from Airtel DTH. We have provided a step-by-step technique for eliminating channels from Airtel DTH using one of three methods.

Whichever strategies you wish to use, you can use the ones stated in this post. We have done our best to provide you with a simple solution using a screenshot.

In addition to this, we have included answers to commonly asked questions about the airtel dth tv channel. As a result, your question about the Airtel DTH channel should be answered.

If you have any questions about uninstalling channels from Airtel DTH, please leave a comment.

The Airtel DTH service allows for different channels to be added and removed from the package. To remove a channel, you must select it on your TV screen and press “delete” with the remote control. You can also ask customer care if they have any questions or issues removing a channel from their package.

How to Set Caller Tune In Jio Phone?

0

Jio phone is one of the most popular phones in India. It has a lot of features that are beneficial to the users. One of the features is that you can set a caller tune for your phone. In this blog post, we will tell you how to do it. Stay tuned!

Do you want the other person to be able to hear the music while calling your JIO number? If so, you’ve come to the perfect spot to learn how to effortlessly adjust caller tune in Jio.

Nowadays, you may have heard a caller melody while contacting most individuals on their Jio Number. It is just because Reliance Jio provides the option to set a music or tune for free.

Reliance Jio is one of the cellular companies that allows customers to enable caller tunes as they choose. It is for this reason that all Jio customers desire to enable their preferred caller song.

In addition, Jio subscribers have the ability to alter and remove their Jio caller tune at any moment. They can activate any tracks or tunes they want to set on their Jio sim.

So, if you don’t know how to establish jio caller tune in your android smartphone or Jio Phone, we’ve provided a step-by-step guide in this post.

How to Change Jio Caller Tune in a Variety of Ways – 5 Techniques

There are five different ways to activate a song or tune as a caller tune with a Jio sim. They use the JioSaavna application, MY JIO application, SMS (Message) Service, IVR Calling Service, and Caller Tune Copying.

As a result, you can use any of the techniques listed below to enable jio caller tune in jio sim on your Android smartphone. Every one of the five methods is simple, and we have described them in detail so that you may follow them.

If you have a Jio phone and want to know how to set Jio caller tune in Jio phone keypad, we have provided instructions below.

How can I change the caller tune in Jio using the Jiosaavn app?

Jio Saavan, popularly known as Jio Music, is a mobile application developed by Reliance Jio for its Jio customers. This software is compatible with the Android and iOS operating systems.

It allows you to listen to music or any song for free, set a Jio tune, manage a playlist, and other functions on the Jio Savaan application. This program is mostly used to set and adjust the jio caller song on a jio sim for free.

By the way, it may also be utilized by other number operators like as Idea, Airtel, Vodafone, and so on. However, in order to enable caller tune, you must have a Jio sim card.

Follow the steps below to learn how to establish a caller song in Jio from my music:

  • To begin, download and install the Jio Savaan app on your smartphone. If you’re an Android user, you can download it from the Play Store, and if you’re an iOS user, you can get it from the App Store. So, simply search for “Jio Savaan: and install it as you would any other application.
  • Launch the Jio Savaan app that you have installed on your phone.
  • Choose your preferred display language from the list and then click the Next button.
  • Choose the languages in which you wish to listen or set the Jio caller tune, then select the Done button.
  • (You have the option of selecting multiple languages.)
  • Now, finish your profile by providing your name, age, and gender, and then clicking the Finish button.
  • Click on search options and look for the music you wish to use as a caller tune.
  • Click on the song for which you wish to set the Jio caller tune.
  • As the music stars play, click on the three-dot, as shown in the image below.
  • Set jio tune choices by clicking.
  • Finally, select the Set jio tune option.
  • Within a few seconds, you will receive a notification from Jio indicating that the Jio Tune service has been activated on your Jio number.

As a result, if you followed the instructions above, you would have quickly learned how to adjust caller tune in jio utilizing the jio savaan programs on your smartphone. When compared to the other way, the key advantage of the Jio Savaan application is that you receive millions of songs to activate.

How do I use my Jio app to activate caller tune?

If you are a Jio customer, you must be aware of the MY Jio application. It helps you to manage your Jio sim by giving a variety of functions. The my Jio application allows you to track numerous activities associated with your Jio number.

The My jio programs allow you to activate and disable your jio sim’s jio caller tune. If you have a Jio sim, you may use this program. There is a very simple technique for activating Jio Caller Tune in this program.

To enable caller tuning in your Jio sim using my Jio application, follow the steps below:

  • Install the my jio app from the playstore or app store, depending on your operating system.
  • Open the My Jio app and log in with your Jio number and OTP. (You must login with the Jio number for which you wish to change the caller song.)
  • Click the Jio Tunes option, which will be visible underneath the trending now area, or discover Jio Tunes by clicking the three bar menu.
  • Now, choose a song from the list or search for one that you wish to use as a caller tune on your Jio number.
  • As soon as you click the song, you must select the set as jio tune option, as shown in the next part.
  • Finally, you will receive a notification on my Jio app indicating the Jio tune has been successfully set, as seen in the image below.

You would have easily learned how to set jio caller tune using my JIO application if you had followed the previous way. You may follow a simple approach to adjust caller tune with my Jio application.

How can I activate Jio caller tuning in Jio through SMS Service?

As you are aware, various services are given by banks, phone companies, and others to activate and deactivate services. Similarly, there is an option to enable Jio Caller Tune via the SMS service.

To activate caller tuning utilizing Message service on your Jio Number, follow the steps below:

  • Open the messaging service app on your phone, which is pre-installed and available on all phone models.
  • In the chat section, type JT and send it to the 56789 number.
  • You must now choose a category from the drop-down menu. Type 1 and submit if you want a Bollywood song. or If you wish to transmit an international music, type 2 and send it.
  • Now, provide the first three words of the song, movie, album, or singer.
  • Now, ten song lists will be generated based on your search.
  • Select the music from the list by entering its serial number and sending it.
  • To set the caller song, you will now be prompted for confirmation. So, type 1 and hit the submit button.
  • You must respond to Y once more for confirmation.
  • Finally, you will be told that the Jio tunes service for your Jio number has been activated.

You would have learned how to set caller tune in Jio via the SMS Service by following the steps outlined above. Simply text JT to the 56789 jio toll free number and then follow the steps that they provide.

How do you change the caller tune in Jio utilizing IVR calls?

As you are aware, many customer services are provided using IVR Calls, which is an interactive voice response system. This method is utilized by the majority of banks, telecommunications firms, and other large manufacturers or providers of goods or services.

There is a Jio caller tune set toll-free number for enabling it via calls.

As we discussed the procedure of using the message service, you must follow the process of utilizing IVR Calls in a similar manner.

To activate caller tuning in Jio utilizing the Calling services, follow the instructions below:

  • Open your phone’s dialer and dial 56789 before dialing it.
  • Select the languages by hitting the number as directed by them.
  • Choose a category from Bollywood, regional, or worldwide.
  • Now, choose music from the song of the day, top 10 songs, and popular songs.
  • Then you’ll be assigned a song to sing. As a result, choose by pressing the number.
  • Choose the sort of user for whom you want to establish jio songs, such as all users or a specific user.
  • Finally, you must press to enable Jio Caller Tune on your Jio number.

You would have learned how to set caller tune in jio utilizing the call service jio tool free number by following the steps outlined above. It is a really simple stage in which you simply follow the instructions by pressing the number.

How can I enable caller tune in Jio by copying another person’s Jio tune?

When you call your friends or someone on their Jio number, you listen to their caller tune and get loved. You also believe that I should utilize the finest music as a caller tune in my Jio number.

So you don’t have to listen closely and then look it up in jio savaan or my jio to activate it. Jio has provided the finest option for you to set your caller tune, which your friend has enabled.

This technology is known as jio caller tune copying. So, whenever you like your friend’s caller music, you may activate it.

To set a jio calller tune by duplicating another’s jio tune, follow the steps outlined below:

  • When you call someone, if you enjoy the music, press * before the next person answers the phone.
  • After pressing the *, you will receive a confirmation message. (You may confirm it after speaking with that individual.)
  • Finally, for confirmation, respond to Y with the same number.

By following the steps outlined above, you would have learned how to enable caller tune on jio sim by copying another person’s Jio Caller tune. This is one of the approaches that was finished in three phases.

How can I change the caller tune on my Jio phone?

If you have a Jio phone, you should also put a caller song on it. The ways that we have listed are applicable to the Jio phone, although some of them are not.

There are several methods for configuring the Jio caller tune in your Jio phone. They are doing so using the Jio Savvan app, SMS Services, IVR Calls, and duplicating other Jio caller tunes.

Only one of the five options stated above for smartphones will not function on your Jio phone, and that is through the my jio app.

By the way, while the my jio app is pre-installed on your Jio phone, the jio tune function is not. So, you may use the JioSaavan app to activate the Jio caller tune in the same way.

Your Jio phone already has the JioSavaan app loaded. You must follow the same procedure as we described for the smartphone, but the interface of the Jio phone will be different, which you must modify.

And the messaging service, calls, and copying other people’s methods for the Jio phone are the same as we said for the smartphone. So, utilizing the numerous approaches, you can simply enable caller tune on jio phone.

How to Activate Jio Caller Tune FAQ

How do I change the Jio caller tune from YouTube to my internal storage?

Many of them look up this term and want to know how it works. If you search on YouTube for how to activate jio caller tune from phone storage and youtube, you will find numerous videos that claim to be 100% genuine.

However, we would like to inform you that all of the videos are bogus. Reliance Jio does not enable their customers to select a caller music from their phone’s storage or from YouTube.

They can’t enable you to choose any song or sound from outside, or there will be an issue. Almost every song, by the way, is accessible on the Jio Savaan application. As a result, there is no official option to establish a Jio caller music from YouTube or phone storage.

How can I activate my Jio name caller tune?

Currently, there are no choices in Jio to set your caller tune based on your name. It would be possible if there was a way to adjust the caller song from the phone’s storage.

It is not possible to enable jio caller tune directly or indirectly in jio. As a result, you will be unable to activate your name caller tune on Jio.

How long does it take to fully activate Jio Caller Tune?

The procedure of enabling and disabling Jio Caller Tune via any means is really quick. As a result, the caller song is engaged on a Jio sim within a few minutes.

When you activate it via any means, you will receive a message confirming the activation within a few seconds. As a result, it does not take long to correctly activate it.

It may take some time due to difficulties, but it should not take too long.

Also Read:

How To Connect Jio Fiber to PC?
How to Delete Chegg Account?

Conclusion

Finally, we anticipate you to have figured out how to set caller tune in Jio for free utilizing the numerous approaches. We have given all of the approved methods for activating caller tuning in Jio sim.

We have discussed five distinct official techniques for creating jio caller tunes utilizing the Message service, the Calling service, the Jio Savaan app, My Jio app, and copying other people’s jio tunes.

With the assistance of images and videos, we have introduced each strategy in a step-by-step manner. A few frequently asked questions and their answers about jio caller tune are also included.

Conclusion paragraph: The Jio phone is a revolutionary device that will change the way we live and work. With its long battery life, free voice calls, and no-contract pricing plans, it’s easy to see why this innovative product has been such a hit with Indian consumers so far. It’s also clear from our blog post how simple it can be to set caller tunes on your new phone! If you’re interested in learning more about all of the features available on Jio phones or would like help setting up one for yourself, please don’t hesitate to contact us at 415-907-5366. We look forward to hearing from you soon!

How to See Instagram Private Account Posts?

0

Do you want to see someone’s Instagram private posts? Maybe there’s a celebrity you’re curious about, or a friend’s account that you want to snoop on. No matter what the reason, it’s actually not as difficult as you might think! Just follow these simple steps and you’ll be able to view any Instagram private account posts in no time. Happy stalking! ?

Do you want to see someone’s Instagram private account in order to see their images, videos, stories, followers list, and so on? If you answered yes, you’ve come to the perfect spot to learn how to access instagram private account posts.

As you may be aware, Instagram allows us to move between two types of profiles: private accounts and public accounts. The majority of Instagram users have a public account, however there are also numerous Instagram users that have a private account.

Since we can quickly access someone’s Facebook or Instagram profile photographs, stories, photos, videos, posts, and so on. However, there is now a difficulty in that,

People who have a private Instagram account’s contents, such as stories, videos, photographs, and posts, are not visible or accessible to other stranger account users unless and until the private Instagram account user accepts our follow request.

But if you want to see that person’s Instagram private account, you don’t have to be concerned. We have described the step-by-step technique for seeing Instagram private account posts. So, let’s get it out there.

What exactly is a private Instagram account?

When a person successfully opens an Instagram account, that account is immediately set to public. Because the account is in public mode, anybody may read the posts or other contents of that specific public account.

However, if someone wants to keep their Instagram account safe so that no one can access or see their posts, videos, photographs, stories, follower list, profile image, Instagram account Bio, and so on.

The user must then enable the secret account in addition to the regular public account. Because the Instagram account has been converted to a private account, no one else will be able to view the material on their Instagram account without their knowledge.

Most consumers will like this feature since it protects their security and privacy. The same functionalities are available on Facebook. You now understand what an Instagram private account is.

Now we’ll know if we can access anyone’s Instagram private account post. So, please respond below, and we will proceed in accordance with your response.

Is it feasible to view an Instagram account’s posts or stories?

By the way, numerous websites or videos are accessible that explain how to check anyone’s private Instagram account data, but most of them do not work.

We tried several methods to view an Instagram account that is secret, but only a handful of them worked. If you’re wondering, yes, we can access private Instagram account posts.

Then my answer is that you cannot directly access anyone’s post, pictures, stories, videos, and so on from anyone’s Instagram private account using any website or program.

However, there are some actual tricks or methods for seeing private Instagram posts. Since I’ve explained all of the strategies that work and do not work.

By learning all of the tactics, you will be able to determine which methods work and which do not. So, how do you view Instagram private account posts?

How to View Private Instagram Account Photos in 2022?

There are a total of four techniques listed below for seeing private instagram posts, three of which work and one of which does not since one of the methods that is widely used on the internet does not function, as we have already said.

Following that private account, creating and utilizing another false account, asking from a friend’s account, and employing instagram private account watcher tools are the techniques given.

All of the procedures for each approach are listed, so let us know what procedures you will need to follow. So, let’s find out.

1. How do I view a private Instagram account by following it?

If you’ve been using Instagram for a while, you’re probably aware that we can only see the private instagram account’s posts, stories, and other stuff when other users follow and the private instagram users accept the request.

Only then will the next people be able to like the post, comment on it, view the tales, profile, and so on. So, if you were unaware of it and want the owner of a private Instagram account to know that you want to read their post, you should follow from your account.

I hope you now understand how to access instagram private account photographs utilizing the authentic follow and accept technique.

If you don’t want private Instagram users to know you’re interested in their posts, try the following approaches. So, let us learn about the various approaches or tactics.

2. How to View Private Instagram Account Photos Using a Fake Account

You may use this technique if you make a request to a private Instagram account that is not accepting you or if you do not let him or her know that you are.

In this strategy, you must make one false account that appears to be a real account, such as a profile photo that corresponds to the next person, whether a female or a boy.

Keep something intriguing in the bio, and keep the name according to the next person. For example, if you want to read the posts of a girl’s Instagram private account, you must make a false account only for that purpose.

As you successfully establish one authentic fake account by looking at other Instagram private users, you should follow that account. Once the users of that private Instagram account approve, you will be able to quickly view the account’s stories and posts.

The following are some quick tips on how to read private profile posts on Instagram using a false account:

How to View Private Instagram Account Photos Using a Fake Account

  • Follow that account from that phony one.

3. How can I use the Instagram Private Account Viewer to read Instagram private account posts?

On the internet, there are many websites with the term private instagram account viewer, and most people search for and visit this sort of website while seeking for a private instagram account.

However, when they visit and complete the procedures that are provided, they are unable to access anyone’s Instagram account’s post, videos, stories, and so on of their private account.

Finally, they learn the truth about those websites. We checked such websites, so if you haven’t tried accessing the instagram private account using the tools offered, you should.

Then I’d want to inform them what happens when you visit those websites. When you visit, you will be asked to provide the username of the Instagram private account from which you wish to read the post.

When you enter, you will be requested to complete surveys or human verification after inputting your login, which is a difficult task. And once you’ve completed the assignment, they’ll ask you for money in order to reveal you the Instagram private account.

So, I’d want to remind everyone not to spend your time with this instagram private account viewer tool viewer or any other secret instagram account viewer software.

4. How to view private Instagram profiles in 2021 by asking access from a friend’s account?

If you don’t want to establish another false account, submit a request to the Instagram private account whose post you wish to read. So, instruct your contacts to send requests from that account.

When your request to your friend’s instagram id is approved, you will be able to view any material the private instagram account has to offer.

I hope you now understand how to view private account photographs on Instagram via a friend’s account. Let’s take a look at some of the most often asked questions about the Instagram private account viewer.

How can I read posts from a private Instagram account?

How can I view private Instagram posts if I don’t follow them?

If you want to access private instagram posts without following, you need make sure that the other person whose private instagram account you want to visit is unaware that you are attempting to view their website.

So, you may follow by making a false account or by using a friend’s Instagram account. This advice is given to you since there are no programs or apps that can display you private Instagram account posts.

How can I access private Instagram posts without requiring human verification?

If you have visited numerous instagram private account post viewer or private instagram story viewer tools, you will notice that the bulk of them will request a survey or human verification.

They do not offer the post and other material of the private Instagram account even after finishing the human verification or survey work.

So, if you want to know how to read Instagram private account posts without verification, then stop looking for tools or software for seeing Instagram private accounts as soon as possible.

Because there are no tools or applications that allow you to view Instagram private account posts or stories. You must follow or be followed by a phony account or with the assistance of a friend’s Instagram account.

Also Read:

How To Connect Jio Fiber to PC?
How to Change Mobile Number in Indian Bank?
How to Delete Chegg Account?
How to Remove Gmail Account From MI Phone?

Conclusion

I hope you were aware of how to see instagram private account posts. We attempted to inform you of the realities of accessing the Instagram private account.

We have provided the genuine techniques for accessing an Instagram private account via a fake account, by following the account, and with the assistance of a friend’s Instagram account.

We’ve gone through each option for viewing an Instagram private account’s post in great detail. Also, we’ve been taught that the tools technique is ineffective and that we shouldn’t spend our time.

Guys, I’d like to inform you that there are several websites and videos accessible that teach you incorrect ways for seeing an Instagram private account.

If you have any questions about seeing an Instagram private account, please leave a comment below.

Conclusion paragraph: In the end, it is better to be safe than sorry. You should always make sure that your account is not public and private so you do not have to worry about people seeing what you post. However, if someone does happen to find a way around this security measure, there are a few alternatives that might help you out!

How To Connect Jio Fiber to PC?

0

Are you one of the many people who are eager to try out Reliance Jio’s new Fiber service? If so, you may be wondering how to connect your PC to the network. In this article, we’ll show you how easy it is to get set up. Keep reading for step-by-step instructions.

Have you bought a JIO Wifi device to use as a wifi network? Don’t worry if you bought it but don’t know how to connect it to your devices. So, in this essay, you will learn how to simply connect Jiofi to a laptop or a computer.

Along with them, you will learn about the capabilities and functions of this Jiofi hotspot gadget, as well as commonly asked questions regarding it. So that you don’t have any questions about this Jiofi equipment.

JioFi is the greatest hotspot gadget for a laptop or PC to improve internet connection speed. This jiofi gadget can connect to a variety of devices, including computers/laptops, laptops, tablets, smartphones, and other internet-connected devices.

This device is available in a variety of models, with some allowing you to connect up to 10 devices and others up to 31. By the way, we don’t need more than 10 devices to connect.

As you are aware, this Jiofi equipment only supports Jio sim cards. As a result, before continuing, make sure you have a Jio sim card. So, how do you connect to the internet from a Jiofi gadget to a laptop or computer?

How to connect to the internet from a Jiofi to a laptop or PC – 3 Methods

You may connect your jiofi hotspot device to a PC or laptop using one of three techniques. WIFI, USB Tethering, and WPS are the methods used.

As a result, you may use it wirelessly as well as through a wire cable. There will be no difference between connecting through wifi, USB, or WPS.

All three options will deliver the fastest internet speed to your PC or laptop device. If you use it through wifi or WPS and keep it so far away, you will, of course, have a low network.

How can I link JioFi to my laptop through WiFi?

Most individuals simply use wifi to connect their PC or laptop to a hotspot device. If you’re connected to many devices, you’ll almost certainly need to use wifi.

So, if you connect Jiofi to your system laptop or pc, keep it close to your gadget. As a result, the jiofi gadget may provide stronger signal strength to your computer.

To connect your laptop/computer to the Jiofi gadget through wifi, follow the steps outlined below:-

  • To begin, plug the Jio sim card into your Jiofi gadget. So, to insert your Jio sim card, follow the instructions below:
  • Remove the jiofi device’s rear cover.
  • Second, remove your jiofi device’s battery.
  • Insert the macro sim card into the sim card slot at this point.
  • Second, write down the SSID (Service Set Identifier) and password on the reverse side of the paper, such as in a notebook or notepad. When you remove the batteries from your Jiofi device, you will be able to see the SSID and password.
  • After you’ve installed the battery and cover, turn on your jiofi gadget by pushing the power button for 2-3 seconds.
  • Now, navigate to your laptop or desktop system’s wifi settings. So, on the right side of the bottom, near the battery icon, click the internet icon, which is found on practically every Windows laptop or pc. (If your system’s wifi is already turned on, you will see the wifi icon.)
  • To switch on the wifi, click the symbol, or go to the system settings of your computer.
  • When you turn on your laptop’s wifi, it will look for your Jiofi device. As a result, you will need to wait a few seconds before it does not scan the Jiofi device.
    When your jiofi’s SSID displays there, click it.
  • To connect, click the Connect icon. Wait a few seconds after clicking it for it to verify the network requirements.
  • Then you’ll be prompted to input the security code. So, as we mentioned previously, input the password and make a note of it on the jiofi gadget. After you’ve entered it, select the Next option.

As a result, when you choose the next option, a connection will display beneath the SSID of your Jiofi device in your wifi settings. So, with the aid of videos and the methods outlined above, you should have a good understanding of how to connect jiofi to laptop with wifi.

How to use Jiofi as a wifi hotspot on a laptop with a USB cable

When you buy a new jiofi gadget, you get a charger with a USB cord that can be used as a smartphone charger. So, using that USB Cable, you may also connect to the internet from your Jiofi device on your laptop.

Connecting your laptop to a mobile hotspot with a USB cable is the same procedure.

So, follow the steps below to connect your laptop to Jio WiFi using a USB cable:

  • Simply attach the B connection to the jiofi device into which you plug it to charge it.
  • Second, plug the USB cord into the USB port on your laptop or desktop computer.

As soon as you attach both jacks to the port, your jiofi will be instantly connected to the laptop. When a result, instead of the wifi icon, it will change to the LAN icon as it connects.

You can see if your laptop has successfully connected to your Jiofi network by glancing at that indicator. You may also quickly access the internet from any browser on your machine.

As a result of completing the steps outlined above, you now understand how to connect a Jiofi to a laptop via a USB connection.

How can I connect a Jiofi to a laptop through WPS?

If you’re not sure what WPS features or functions of a Jiofi device are, read on. Then don’t be concerned. WPS stands for Wi-Fi Protected Setup.

WPS is a button found on practically every hotspot or router device. It is mostly utilized when you have forgotten the password for your Jiofi device or other router devices.

You may use this approach to connect Jiofi to your laptop even if you have forgotten the password. And after connecting it, you’ll be able to see the Jiofi device’s password.

This WPS button is mostly utilized when you need to share your Jiofi internet connection with a friend’s device. So, if someone asks you to connect to the internet using your jiofi, you don’t need to give the password.

Follow the steps below to connect to the internet without a password using the Jiofi WPS button:

  • Turn on the jiofi device and hold down the WPS button for 2-3 seconds. This WPS button may be found on the right side, just below the power button. When you push it for 2 to 3 seconds, the wifi light on the Jiofi gadget will begin to flicker in green.
  • Now, under the taskbar, beside the battery symbol, click on your laptop’s wifi icon.
  • After scanning, click on your jiofi’s SSID.
  • Then, click the connect button, and it will connect automatically without requiring a password. (If you are prompted to enter a password, wait a few seconds.) It will connect automatically.)

So, by following the steps outlined above, you now understand how to connect a Jiofi to a laptop through the WPS feature. As a result, you can employ this strategy anytime you require it.

What are the characteristics and functionalities of the Jiofi device?

Finally, you are aware of how to connect JioFi to a laptop or PC. However, this is insufficient; you must also be familiar with the characteristics and operations of the JioFi hotspot router equipment.

This JioFi gadget has several functions that every JioFi customer should be aware of. There is a battery indication, a wifi indicator, a network indicator, and so forth.

As a result, depending on the circumstances, they light in different colors and flicker. So, by watching the movies below, you can learn about all of the functions of the JioFI gadget.

FAQ on How can I link my Jiofi to my laptop?

How can I check the jiofi balance on my laptop?

In the same manner that you must check the data balance of your smartphone, you must also check the data balance of the Jio sim that is plugged into the Jiofi router device.

It is critical to monitor the consumption and balance of the jiofi device’s jio sim card. Then you may use it according to your consumption every day and replenish it at your leisure.

To check jiofi balance in a laptop or desktop machine, perform the following steps:

  • Open a browser and navigate to jio.com, the company’s main website.
  • To sign in, click here.
  • Then, select the JioFi option.
  • Enter the Jio number that is stored in your JioFi hotspot router device, and then click the Generate OTP button.
  • Choose an alternative mobile number or an Aadhar-linked number. So, choose anyone from whom you would get OTP. (When you purchased a new JIO SIM Card, the vendor requested an alternate mobile number and Aadhar number. So it retrieves and displays data from that source.)
  • After you’ve made your selection, click the Generate OTP button.
  • Now, input the OTP and press the submit button. You will be successfully logged in with your jiofi device sim card after inputting it.

After logging in, you may view your data (Internet) use and expiration date. You can track and check numerous things, as well as recharge. As a result, you may check the data balance of the joFi device in this manner.

As a result, it is the most significant thing that you should know because you already know how to connect jiofi to laptop. However, if you do not know how to check data balance, you may have difficulties.

Why isn’t my laptop connected to JioFi?

The following are some troubleshooting steps you should take and directions to follow so that your JioFi device may be successfully connected:-

  • Re-insert the Jio sim card into your JioFi device.
  • Check that the JioFi gadget is turned on and that the battery is fully charged.
  • WIFI should be enabled on your laptop, and it should be re-scanned.
  • Examine the JioFi icon’s indicator light. If there is a green network, it means that the network is complete.
  • Similarly, the blue network represents an average signal while the red network indicates a bad signal. If there is a red network, keep it where there is a good signal.
  • For a better network, JioFi should be linked to no more than 10 devices at once, and the distance between JioFi and laptop should be no more than 10 meters.

How can I boost the speed of JioFi on my laptop?

You now understand how to connect Jiofi to a laptop. However, if you have a sluggish internet connection, you will have a problem. Again, you must conduct your own study, but we have discussed it here.

With the same Jio Sim card that you entered into the JioFi gadget, you may occasionally receive a high-speed network on your smartphone. However, with the same Jio sim card and JioFi gadget, you receive sluggish speeds.

Even though the green network light shows that a good signal is being received by your JioFi device, your laptop will not receive high internet speeds from the JioFi router device.

Essentially, Jio’s network infrastructure provides networks in three bands: band 3, band 5, and band 40. So, if you’re not sure what the role of this band in the network signal is, let me explain in brief.

Band 3’s range is distant from other brands, but it gives a sluggish network, whereas band 5’s range is medium and it provides a medium network. In the same pattern, band 40 has a modest range but a high speed when compared to bands 3 and 5.

As a result, you must set your jio f device to band 40. To boost jioFi speed, follow the instructions below:

Using your computer’s browser, navigate to http://jiofi.local.html. Before accessing this page, make sure your device is connected to the jioFi.

  • To log in, click the Log In button and enter your username and password. Every JioFi device’s default username and password is administrator. After you’ve entered your information, click the Login button.
  • In the network for APN attach setting, go to setting and pick the Manual option.
  • Choose IPV4 from the IPV4/IPV6 Mode options. (Important option)
    Now, press the Apply button.

You may now test your network connection; your internet speed will almost certainly rise when compared to the previous speed. As a result, you may quickly enhance your speed. By following the procedures outlined above, you may create a jioFi router hotspot.

Finally, how do you connect internet from Jio Wifi to a laptop?

Finally, I want you to be well-versed in the numerous techniques for connecting JioFi to a laptop. There will be no variation in internet speed between the three options.

In addition, we have attempted to address all of your concerns through the use of frequently asked questions. We have provided films describing the capabilities and functionalities of the Jio wifi router gadget.

As a result, all of your questions about JioFi’s features should be answered. If you have any questions about the JioFi gadget, please leave a comment below.

Also Read:

Conclusion

Connecting a JioFi to your PC is an easy process. All you have to do is purchase the dongle from their website, plug it into an available port on your computer and download the app for network access. Once that’s done, you can use the internet as much as you want without worrying about data usage or speeds! If all of this sounds intimidating and you want help enacting these principles, let us know. Our team of experts are ready and waiting to partner with you to create a stellar SEO or marketing plan that drives sales by considering how your customers think. Which of these cognitive neuroscience principles have you applied?

How to Delete Chegg Account?

0

If you’re looking for information on how to delete your Chegg account, you’ve come to the right place. In this article, we’ll explain how to delete your account both through the website and through the app. We’ll also provide some tips on how to export your data before deleting your account. So whether you’re ready to say goodbye to Chegg or just want to make sure all of your data is backed up, keep reading for all the details.

Do you want to know how to remove your Chegg account? If so, you’ve come to the perfect spot for a step-by-step guide to entirely deleting your Chegg account.

As you are aware, Chegg is the finest platform for students in America to learn. It offers kids a high-quality education in practically every topic.

In addition to utilizing the platform, students must pay the cost as a membership to this website. Since practically all educational work is delivered to students at the highest level.

However, if you need to remove your Chegg account permanently for whatever reason, you may do so effortlessly. Maybe you finished your studies, or maybe you’re getting a lot of spammy emails from Chegg.

if you believe you will be unable to pay their monthly fee. There might be several causes, however we have provided a step-by-step approach with a screenshot on how to remove a Chegg account. So, let’s find out.

What is the difference between canceling an account and subscribing to Chegg?

When you deactivate your Chegg account, all of your personal data is totally erased from your account, and the user cannot reactivate their account.

However, if you cancel your Chegg membership, you will be able to access some of the services for free, such as buying books, writing tools, and flashcards.

As you are aware, you must provide your credit card information on Chegg in order to obtain a membership. So, if you wish to erase your Chegg account, you must cancel your membership before a week before the due date.

Because removing your Chegg account takes a few days, and if you do not cancel, the subscription price will be taken from your credit card.

If you do not know how to cancel a Chegg membership, we have provided instructions below in this post. So, first remove your subscription pack, and then cancel your Chegg account.

How can I remove my Chegg account? There are four options.

We have discussed four methods for Chegg data deletion request techniques for deleting your Chegg account in this article. They do so by accessing the Chegg official website, making email requests to the Chegg staff, and so on.

as well as by sending tickets to Chegg. So, these are the ways that we have introduced step by step with the assistance of screenshots for each approach.

So, you may use whichever way you wish to delete your Chegg account because all of the options listed below will work. So, let’s find out.

Note: Make sure to cancel the active subscription, return the leased textbooks, and ensure that there are no outstanding transactions, or your Chegg account will not be canceled. Then, all you have to do is follow the steps outlined below to remove your Chegg account.

How can I delete my Chegg account via the Chegg website?

To delete your Chegg account, follow the steps below:-

  • Log in to your Chegg account with your email password or whichever password you use to access your Chegg account.
  • In the top right corner, click the profile symbol.
  • Then, select My Account from the drop-down menu.
  • Select the Communication tab.
  • Then, on the right side bottom, click on the contact choices.
  • Select the “I’d want to close my account” option.
  • Scroll down to the fill out this form link for the Chegg data deletion request, and then click it.
  • Now, a form will appear, which you must fill out and submit.
  • Enter your first and last name, as well as the email address you used to activate your account.
  • Finally, in the request type drop-down menu, pick data deletion.
  • Fill out the captcha and press the submit button.
  • When you click the submit button, you will be prompted to confirm through email in the following step. So you’ll be seen there – one more step! Your identity must be verified.
  • Open the email address you provided when submitting the chegg data deletion request, and you will get one email from the chegg team. So, open the confirmation email and click on the link.
  • Finally, you will be notified when your request has been approved.

Your Chegg account has now been asked to be permanently deleted by the Chegg staff. After a few days, your Chegg account will be entirely destroyed, and you will no longer be able to access any of its data.

This was the method for deactivating your Chegg account via the internet. Let us now communicate using email services.

How can I remove my Chegg account using email?

If you do not wish to request chegg account deletion permanently by filling out a form on the internet, you can alternatively request chegg account deletion by email to the Chegg staff.

In this way, all you have to do is send a message to the Chegg team, mentioning the subject and issue or request, and you’re done. After a few days, your account will be entirely wiped.

By the way, Chegg does not encourage this approach for requesting to deactivate a Chegg account because there are existing ways for requesting on the Chegg platform.

However, here’s how to submit a message to Chegg to request that your account be deleted:

  • Open Gmail on your smartphone or PC and log in with the email address associated with your Chegg account.
  • To send messages, go to the compose ‘+’ option.
  • Closemyaccount@chegg.com or jack@chegg.com should be used as the to option, which is the email receiver’s address.
  • In the subject line, type ‘Chegg Account Deletion Request.’
  • You must now type the message in the body area. The email that you will compose that is not needed to be properly written might be as basic as that. Let’s go over everything you need to include in your email in the section below.
  • Mention your name as well as the reason for deactivating your Chegg account.
  • And make it clear what you want to request.

An example of an email format for canceling a Chegg account;

My name is (your name), and I’ve been using Chegg since (Time in weeks or months). Because I have completed my studies, I no longer require this Chegg account. So, I’d like you to cancel my Chegg account and cease sending me emails from Chegg. And my (your email address) is linked to my Chegg account.

Thank you (sender name)

  • Finally, use the Send button to send your email to Chegg.

You would have known how to remove a Chegg account by sending an email if you had followed the steps outlined above. We’ve talked up to two approaches. Now, let’s look at the other options.

How can I remove my Chegg account via live chat?

There is also an option to request that your Chegg account be deleted, and it is the quickest approach available.

In this way, you just message the Chegg staff of any individual in the live chat, and your account is erased as soon as that person enters the conversation.

In this case, you’ll need to perform some of the same processes we’ve stated on the website by using form techniques. So, let’s go over the procedure.

Follow the steps below to learn how to remove a Chegg account quickly using live chat:

  • Log in to your Chegg account and select the profile option to open my account.
  • Navigate to the communication tab, then to the contact option.
  • To access the talk with an advocate option, click here.
  • Now, you will first receive an automatic answer, but subsequently, one of Chegg’s representatives will be linked to you through live chat.
  • So, just say in the chat, “I want to remove my Chegg account,” and your Chegg account will be terminated right away.

In this case, you must speak in the live chat and request the deletion. As a result, you should be aware of how to remove a Chegg account utilizing live chat.

How can I terminate my Chegg membership?

If you wish to discontinue your Chegg study membership, you may do so quickly. As previously stated, if you have a paying membership, you should terminate your Chegg subscription within a week.

Otherwise, if it is not canceled, the subscription will be renewed and you will be charged. So, how do you cancel your Chegg subscription?

To cancel your Chegg study membership, follow the steps below:

  • Go to my account after logging onto your Chegg account.
  • Select the Orders tab.
  • Finally, you’ll be able to terminate your membership. So, select the option to terminate your membership.
  • You must now pick the reason for canceling the Chegg subscription packages. So, it doesn’t matter whatever choice you choose from the list.
  • If you continue, your Chegg subscription will be terminated.

You may quickly cancel your Chegg account subscription by following the step-by-step instructions. Now, let’s look at some commonly asked questions regarding deactivating a Chegg account.

FAQ on How to Delete a Chegg Account

How long does it take Chegg to remove your account?

Since, The precise time it takes to delete a Chegg account has not been stated either on the Chegg official website or by Chegg.

However, it might take anything from a week to a month. It is dependent on how you apply for the deletion of your Chegg account. If you use the process of filling out a form and applying, it may take around a week.

However, if you request by email, it may take up to a month, which is not guaranteed; it may also be completed in one day, but it is the utmost time we are able to provide.

And if you request it via live chat, your Chegg account will be erased promptly if there is no problem. Ao, you’d think you’d know how long it takes Chegg to remove your account by now.

How do I get rid of my Chegg student account?

You can delete your Chegg account in the same way if you want to erase your student, parent, or tutor chegg account. You will need to use any of the strategies listed in this article.

There are three ways to delete a Chegg account: on the website by filling out a form, by email, or via live chat. So, use any of the ways listed above to be able to remove your Chegg students account.

What happens if you cancel your Chegg account?

When you deactivate your Chegg account, all of your personas and information are completely gone, and all data in your account is forever lost.

As a result, you will be unable to reactivate your Chegg account. You will not be able to revive your Chegg account after it has been totally destroyed.

After deleting your Chegg account, you will need to establish a new account in order to access Chegg. I hope you received your answer to what happens when you remove your Chegg account, right?

Also Read: How to Remove Gmail Account From MI Phone?

Conclusion on Removing Chegg Account

I hope you learned how to completely remove your Chegg account. We did our best to assist you with a solution in simple stages.

In this post, we discussed the three various techniques for deleting a Chegg account. In addition, we have given each operation with step-by-step instructions and screenshots.

If you have any questions about Chegg, please leave them in the comments below and we will respond as soon as possible.

Chegg is a great resource for students, but there are plenty of other sites out there that offer the same services. Get rid of your account by following these steps! – To delete an account on chegg go to “Account” in the top-right corner and select “Delete Account.” – Fill out the form with your email address, birth date, password confirmation and last 4 digits of credit card number or student ID. – A pop up will ask you if you want to remove all associated information from their servers. Select “Yes”. – Finally click “submit” at the bottom of the page! Your account is now gone forever.

Uttar Bihar Gramin Bank Balance Check By SMS And Missed Call

0

Uttar Bihar Gramin Bank is one of the most popular and trusted banks in India. If you are a customer of this bank, you can easily check your account balance using SMS or missed call. In this blog post, we will show you how to check your account balance using SMS or missed call. So, let’s get started!

In this post, we will provide you with information on how to inquire about the Uttar Bihar Gramin Bank Balance via SMS and missed call services.

Before we continue, let’s take a quick look at Uttar Bihar Gramin Bank.

People used to have to go to their local bank or ATM to check their bank balance and small statements before they could use the missed call and SMS services. This is a time-consuming process, therefore as technology advances, the bank has addressed this issue by introducing SMS and Missed Call services.

Balance Enquiry Number for Uttar Bihar Gramin Bank

These days, innovation is accelerating, and the most recent information regarding bank accounts is available through internet services such as missed calls and SMS services. If you haven’t already registered your cell phone with Uttar Bihar Gramin Bank, do so right now to take use of these services.

We explained how to do a balance enquiry utilizing the Missed-call option below:

Step 1: First, ensure that your cell phone number is linked to your bank account. You will be unable to utilize this service if your cellphone number is not registered.

Step 2: Call this number: 9223008811.

Step 3: Make a missed call to this number, and your phone will be terminated immediately after two three-rings.

Step 4: Within a few minutes, you will receive an SMS from Uttar Bihar Gramin Bank at your registered cellphone number, which will include account balance information.

For SMS Alerts, enter the UBGB Balance Check Number.

To use the SMS service of Uttar Bihar Gramin Bank, you must first visit your local bank branch and enable SMS Banking. After that, you will be able to use SMS service on your mobile phone by following the steps outlined below.

Step 1: First, send a text message to 9223008811 with the subject “Bal Account Number>.”

Step 2: After sending this text message from your registered phone number, you will receive a return message from the bank, which will provide your account balance information.

How to Check the Balance of the Uttar Bihar Gramin Bank Online

You must have an internet connection and a device such as a mobile phone, tablet, laptop, or computer to use the online bank balance enquiry service. The steps for online Bank Balance Enquiry are described here.

  1. To begin, go to the Uttar Bihar Gramin Bank’s official website at www.ubgb.in.
  2. After that, click the “Continue Login” button, and then enter your ID and password to access your personal banking.
  3. After that, press the submit button.
  4. Select the account for which you wish to know the balance, and your account balance will appear on your screen immediately.

About the Bank:

North Bihar Gramin Bank is one of India’s major regional rural banks. Muzaffarpur is the bank’s headquarters. North Bihar Gramin Bank has branches in more than 18 districts in Bihar. North Bihar Gramin Bank was established in Bihar in 2008. The Central Bank of India supported this bank.

Also Read:

Conclusion

We hope you have received all of the information you need regarding the Uttar Bihar Gramin Bank balance inquiry. We’ve covered all of the popular and simple options for checking your account balance while sitting at home.

You may also check the balances of Bihar Gramin Bank, Madhya Bihar Gramin Bank, Dakshin Bihar Gramin Bank, Baroda UP Gramin Bank, Paschim Banga Gramin Bank, Kashi Gomti Samyut Gramin Bank, and Andhra Pragathi Grameena Bank, among other Indian banks.

The Uttar Bihar Gramin Bank has made it possible to check your account balance by SMS or missed call. This is a huge convenience for people with limited internet access and busy schedules.